110 rpm Gear 16 450 watts 30 sec. Stuart is holding it. Brian is hanging on. Anthony is focused and me, well I’m just hurting. Others in the class are working at their level, which is exactly what they should be doing. Most are just looking to burn some fat, maybe get fitter, but others are doing more than that; they ride outside as well as inside. Take a moment to meet them….
We all have one thing in common, we love to ride bikes and we’d love to ride better and be able to ride for a long, long time. We all spend time at the gym and go through some phases of greater dedication and motivation than others. We have time constraints, work constraints, family and social constraints and yes, we do like things other than cycling too. So what should we do to get better on the bike, to give our cycling lives greater quality, enjoyment and longevity?
Well the pros get it all: Nutrition, massage, strength programs, data tabulated, rest periods. Did I mention massage? And oh yeah, mostly, they get paid, but what about us? A little research reveals lots can be done, but for right now we’re going to restrict ourselves to what you can do in three different areas off your bike to make you better on your bike.
Race Neutral – The Gym Strength and Conditioning Phase
“My legs hurt” Bert Grabsch HTC Highroad during the TDU 2011.
Let’s start with some cycling anatomy. Have a look at the diagram opposite.
Here you can see the prime muscles involved and at what point of the pedalling action they play their part. A key point is that it is not just the strength of these muscles but the order and pattern in which they fire that will bring the result onto the bike.
One thing I have seen time and again is people training to strengthen their cycling without taking the simple idea of re-creating the cycling position into account in their resistance training. I believe the key to success is to try to create a loading in the same fashion as you would experience on the bike and then increase that loading or the speed/power of your movement pattern.

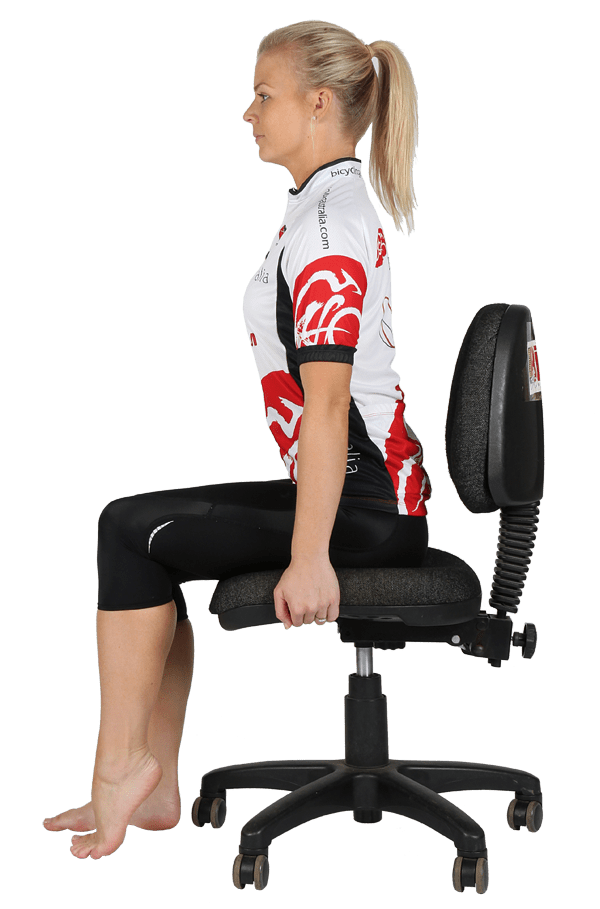
The way to do this is to think about the position your body is in when you’re exercising, particularly at the gym. The knees should be flexed throughout all movements without locking at 180 degrees at any time. The ankle should always be flexed without your heel touching the ground. Pedals only attach at your forefoot, so if you’re doing squats or lunges with your heels on the ground, try lowering the weight and getting your position right. The spine should be flexed at your personal range but not necessarily loaded. When you’re on a bike you don’t have someone sitting on your shoulders so heavy squatting movements aren’t very cycle specific. While squats have their place, the 45-degree incline leg press will be better. Look closely; it’s almost like riding a bike, only lying on your back. As a basic rule, any movement you do should be done as much as possible simulating the riding position
Starting with this as our base and assuming we are all relatively healthy (we’ll save injury management for another day), here we go. Some self-assessment first: Check your range of mobility at some key joints – ankle, knee and hip using a table. If your mobility is good, go for it. If not, ensure you are comfortable with your ranges and start a stretching program.

Warming up: 10 minutes using a stationary bike or trainer, (simulate what you’re about to train) you’re ready to go. Remember, you ride in the sagittal plane so all training will be done in this plane.
Let’s assume a 60-RPM tempo for our initial phase of six weeks, so each rep should be performed over the duration of one second and as a standard rule, breathe in during the easy part, out during the harder part. Never hold your breath. You may find it good to do this warm up by riding to the gym.
Staggered Pedalling Lunges
When clipped in, your feet never get further apart than the diameter of your crank ends, therefore when lunging, mimic this distance plus a little to allow for the circular nature of pedalling. Once set in a lunge position, lift your heels into the air and flex the knees to about 110°. Flex through your spine and simulate your bike position. Begin your lunge by descending forward to your comfortable limit, circle back through your maximal range by pushing your hips down, out and return up to your start position. Perform one full set then switch stance to the opposing leg forward. (Progressive: add Dumbbells)
Part Two The Indoor Cardio Conditioning Phase
“If I were a dinosaur I’d be a Quadrasaurus” Andre Griepel HTC Highroad TDU 2011
This is all about riding indoors to improve outdoors. The simple, easy thing a lot of people do is just go to the gym and jump into a spin class. It’s easy to do, but not necessarily what you need to be doing.
Darren O’Grady used to teach a spin class at 06:30 each Monday morning following a weekend of his own personal racing. In this class everyone did what he did, (I don’t think they had a choice) but participants loved it and they loved it because it was a targeted session. This was Darren’s recovery and everyone learned the principles and received the benefits. Heart rates were kept at sub-maximal levels, RPMs were kept high, resistance was low, and technique was everything.
Other sessions were very different. Wednesday night with ‘Dave’ (not his real name to protect the innocent) was always known as ‘death night’. It involved high resistance and you would be pushing your maximum heart rate. So sometimes you’re a little at the mercy of your instructor, yes? Well no, remember you’re riding your bike not them, so you do have control, just let them know your objectives and a competent instructor will help, not hinder.
So what should our guys be doing? Remember the constraints. Time, time, time. This has got to be fast and effective with each session under 60 minutes.
Road Racing and Hills
This session is probably one of the most effective sessions you can do. The work phases alternate between anaerobic threshold sets at 60, 45, 30 and finally 20 second intervals with reducing recoveries and tempo sets on high gearing to simulate hill climbs.
Difficulty level: Hard. Do the workout but take it at your own pace and increase your workload as you are able. Monitor your gearing, RPM and wattage relative to your heart rate (HR).
Sprints and Surges
This session is pure anaerobic terror. Nathan Hunter and I used to do this to improve surge work for criterium racing. There are eight intervals during the main work sets that are 20 seconds on and only 10 seconds off. You got that right, 20 on and only 10 off. You use the same gear the entire time at maximum effort, trying to hold as high wattage as possible in all eight sets. Our benchmark was 450+ watts in every set. There are long recoveries in between and believe me, you need them. To finish this workout there are six 10-second sprints at maximum effort with a 50-second recovery on low gearing. By the end, your legs and heart will have reached a new level. Once this workout has been done a few times your body will develop strength quickly and your ability to output higher levels of power will increase in a just a matter of weeks. So will your legs, they’ll look the business, people will think you’re a Quadrasaurus and you’ll feel you deserve that expensive bike upgrade.
Difficulty level: Very hard. Do the workout but take it at your own pace and increase your level of workload as you are able. Monitor your gearing, RPM and wattage relative to your HR.
Recovery
This session is one you should do following your hardest day either on or off the road. It involves speed sets of increasing RPMs with even recoveries, all on low gearing, with some single-leg high-gearing technique work. It gives a great session and will leave you feeling capable of doing more on the road sooner than you thought.
This workout is set at a lower HR level than others specifically to provide a dynamic recovery for your working muscles and each set is focused toward perfecting technique. I received the nickname in my early strength coaching days as ‘Technique Freak’ and I believe firmly in the principle that says you will get the best possible results when you do it right the first time and every time after that: Walk before you crawl, crawl before you run.
Difficulty level: Easy, although the single-leg technique drill is surprisingly difficult. Once you revert back to both legs you will feel a new ability to turn those pedals under control. You will be able to recruit more muscle more evenly from your thighs, hips and the forgotten muscles; the hamstrings and calves. Monitor your gearing, RPM and Wattage relative to your HR.
What do our guys need? Brian is looking for sprints and recovery. Anthony is doing the hills day and recovery. Stuart is being a little more canny, doing hills plus recovery in Week one and then sprints plus recovery in Week two, alternating week to week from then on. And me? Well I get all three in, guess I’m just lucky.
Part Three Recovery phase
“I feel gooood” Michael Matthews Rabobank techno dancing in cleats just before stage 2 TDU 2011
The pros get massage. They get a racing program crafted for them by team directors. Training, loading, all factored in and recovery to ensure peak performance when they need it dependant on their specific race objective, but most importantly; they get massage.
According to Holistic Online, “Therapeutic massage helps the body recover from the stresses of strenuous exercise, and facilitates the rebuilding phase of conditioning. The physiological benefits of massage include improved blood and lymph circulation, muscle relaxation, and general relaxation. These, in turn, lead to removal of waste products and better cell nutrition, normalisation and greater elasticity of tissues, deactivation of trigger points, and faster healing of injuries. It all adds up to relief from soreness and stiffness, better flexibility, and less potential for future injury.”
Chukyo University in 2008 conducted a test on 11 female cyclists and the effects of massage on strenuous cycling and found the following results:
- Improved recovery from measured muscle stiffness
- Improved perceived lower limb fatigue
- Total power enhancement post massage
For details check out the link below
http://content.yudu.com/Library/A1nb1z/InternationalTherapi/resources/38.htm
What do our guys get? If you’re one of the lucky ones, a regular massage by a reputable person and I highlight the word ‘reputable’, once a month. If this however, is inaccessible, I would then encourage self-massage, and the most effective form of self-massage involves a Bolster, a solid foam roller about a metre long and 120mm diameter. Put simply, a bolster replicates the ‘massaging action’.
A quick return to anatomy: The prime muscles involved in cycling are Gluteals, Quadriceps, Calves and Hamstrings.
First things first: Assessment. A quick run over your body by that reputable masseuse will inform them, and then you know exactly where things are. But we’re using the bolster, so here are five movements that will release tension and breakdown waste products. They will also let you know immediately where you are on the scale of one to “I need major help, what have you been doing to me?”
All movements with the bolster involve placing the focus muscle group upon the bolster and ‘rolling’ the muscle over the bolster. Instead of the rolling pin (the bolster) being on top of the dough (your muscle), it has been reversed. You use your own body weight to apply the pressure onto the muscles. If you experience less than 30 seconds of ‘rolling’ and you need to stop then you’re in need of greater recovery. A reasonable expectation is that 30-60 second recovery levels are average while 90 seconds or more indicates you’re recovered.
So roll out your Gluteals, Quadriceps, Calf Complex muscles, Hamstring and your Illiotibial band. This band is not a prime mover, but it is key to patella alignment.
In addition to this I would add a Qi Gong (pronounced chi-kung) breathing pattern and a mini yoga Sun Salutation sequence to round out your recovery session. Both forms aid mobility and grow three-dimensional breathing. Any increase in mobility will be felt immediately on the bike and improvements in breathing will increase oxygen flow to working muscles and the removal of waste.
Qi Gong Breathing
Each full Qi Gong movement pattern involves two breaths. Plantar ankle flexion is cycling-specific but the focus here is in the breath and the extension of the knee, hip and spine.
Stand with feet at hip width. Feel the forefoot and heel connect to the ground. Stack you knees softly above the centreline of each foot. Your hips stack above your knees. Ensure your spine is long and lower your shoulders away from your ears creating length and easing tension from your Trapezius and neck (prime locations of tension for cyclists). With your arms relaxed at your sides breathe in, extending arms out and up and rising onto your toes. Hold for one to two seconds before sweeping down and forward to full a crouch position, exhaling strongly. Reverse sweep back to full extension, inhaling as you go. Lower arms to your sides exhaling fully. Repeat this 10 times.
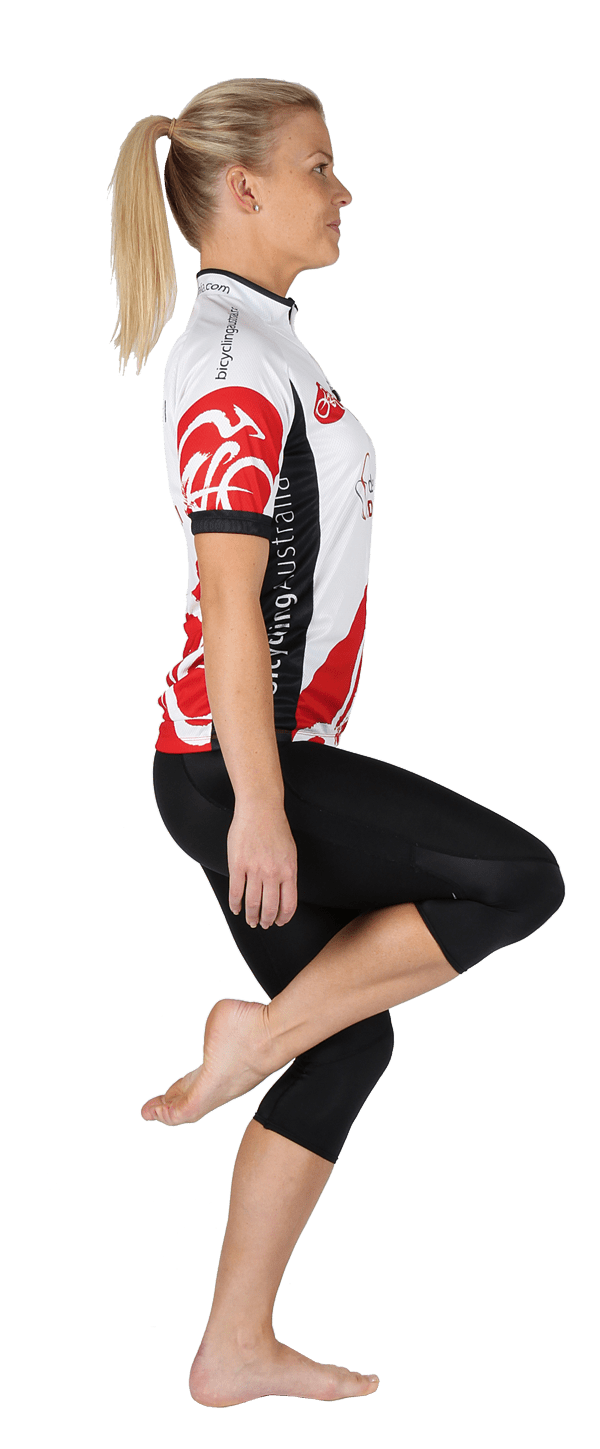
Mini Sun Salutation
A mini sun salutation involves four yoga positions, the Prone Kneel, the Downward Facing Dog, the Plank and the Upward Facing Dog. Hold each position for three full breaths. On your final breath, exhale and move into the next position. Repeat the full sequence five times.
Perform this recovery session of massage, stretching and breathing once each week. A great idea is simply to finish a ride and reach for the bolster and you’ll soon be dancing with Michael.
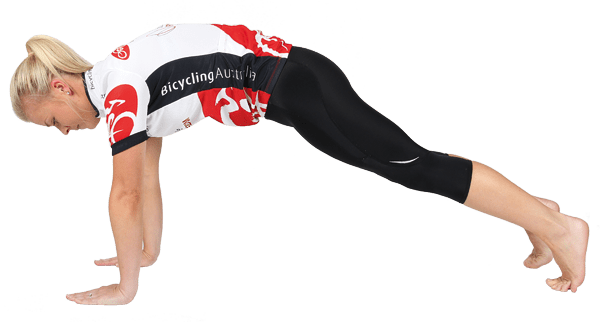
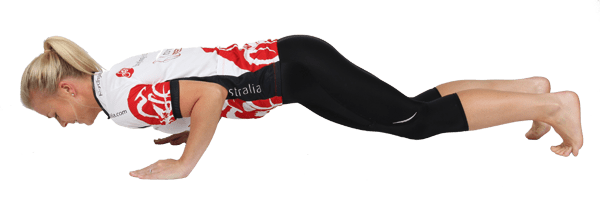
Staggered Hinge Bear Push Ups
The focus is triceps and upper body strength for a stable torso (Watch Fabian Cancellara leaving the start on a time trial. Notice his rock solid upper body). Kneel on floor. Rise onto toes, flex spine and simulate cycling position. Tuck elbows into ribs and drop shoulders halfway to hands, hold for a count of four, drop to just above hands, repeat hold. Return to mid hold then return to start, keeping elbow at 145°. (Progressive: elevate foot position)
Do all the above exercises as a circuit for six weeks performing exercises One to four as part A, then five to eight as part B. In weeks one and two, perform two rounds of 60 seconds for each exercise. Have a two-minute rest between part A and part B, stretching during rest.
In week three, combine part A and B to make one circuit. Perform two sets through, with a 90-second rest in between round one and two. Increase in weeks five and six to three rounds. After that, take one week off from strength training completely. Over the next six weeks adding leg weights will be a great way to increase load. Perform the session once or preferably twice each week. You will find yourself agreeing with Bert.
What do our guys need? Brian is going for two each week, he’s light and lean, and so strength/power is a focus. Anthony has more of a mesomorph body type so once a week on the strength program is OK. Stuart is similar to Brian so he’s going for once or twice a week and me, I’m going to aim for twice a week for the next six weeks.