 The chain. It’s that piece of metal that takes all the power you put out and transmits it to your bike’s rear wheel. It grabs your gears for you, it keeps the wheels spinning and occasionally (just like you) it wears out or it snaps.
At around 6mm in width and weighing in at a bit under 300 grams, your chain does an amazing amount of work on a modern 10 or 11-speed bicycle. Your chain is constructed using side plates, rollers and pins. It’s a relatively simple piece of equipment when compared to something like a rear derailleur or an Ergo shifter, but look a little closer and you’ll notice some of the detail that goes into making it shift and hold gears with consistency. The minute shaping of the side plates and the fine machining that goes into chain construction helps determine just how smoothly and silently it will run and how reliably it will shift.
Campag and Shimano figured out the secret of making a great chain a long time ago and their designs haven’t changed a whole lot over the years, with both offering great products. SRAM came a little late to the party and their early attempts at both chains and front shifting were a little bit hit and miss. The company went through something like 34 different iterations of their chain design to produce a product that now shifts as smoothly and runs as quietly as the other two.
Chain 101
So, how do you look after your chain and prolong its life? The enemy of the chain (and most things in life) is grit and lack of lube. You wouldn’t run your car engine without oil so don’t run your chain dry either. Chains need a light coating of high quality chain oil applied every few weeks to run nicely. If it’s raining or really hot, and the lube can evaporate or get washed away, then you need to apply it a bit more frequently. We’ll cover how to do this in a moment.
In terms of chain life, grit and poor shifting are the biggest killers. If you are the person who constantly rides in the 53-tooth up front and the 25 down the back when climbing hills, or the crit beast who likes to power-shift across the cassette when pumping out 2,000 watts on your way to yet another C-grade victory, then pat yourself on the back because you’re doing your bit for bike shops and chain manufacturers. The more you cross a chain up with your gears and the more you shift while under load, the more metal you’ll carve off your chain, facilitating its premature demise. Chains generally last 3,000-4,000 kilometres but badly treated chains can be shot in 2,000 and well-loved ones can slide out to 6000. It’s really up to you.
Installation
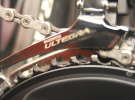
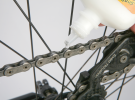
There are a few different ways to size a chain but I’m going to stick with the simplest method here. Make sure if it’s directional (eg Shimano Dura-Ace), that you have the chain orientated correctly (the instructions are your friend) and roll the chain through the rear mech and around the smallest cogs on both the cassette and cranks. Pull the chain ends together until the chain lifts off the base of the bottom of the rear derailleur by a finger width, and you have sized your chain. That’s the easy part. If you’re installing a pin then you’ll need to cut the chain with a ‘male’ and ‘female’ end, if you’re going with a quick link then you’ll need to leave two female ends. Now comes the hard or easy or somewhere in-between bit.
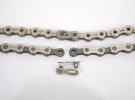
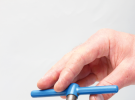
If you’re going with an SRAM chain or an SRAM quick link on your Shimano chain, simply insert the two parts of the quick link, rotate the cranks so the quick link is located at the top-centre of the chain between the cassette and the cranks, hold the wheel in one hand and cranks in the other, and apply pressure to both. You’ll hear a satisfying snap as the quick link engages, job done. Don’t ever re-use a SRAM quick link, your collar bones won’t thank you.
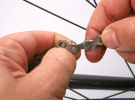
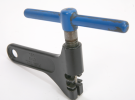
Shimano chain installation is almost as easy. Using either the Shimano or Park chain tool, drive the link pin into the chain until you feel the pressure release, then snap the end off. Sometimes you’ll need to gently flex the joined link a few times to loosen it up.
Campag chain pin installation could really be a whole book all on its own. The procedure differs between 10 and 11 speed and requires different tooling in each case, using the Campag chain tools. Read the instructions a few times and then read them again. Where SRAM and Shimano just join the chain using ready-made parts, Campag actually requires that you manufacture a link pin that is much the same as the machine-installed pins that hold the rest of the chain together. The Campy pin that you create is the best solution to joining a chain, but only if it’s done right. Campag assumes you know what you’re doing and have the right tools.
Cleaning
The build-up of cruddy grease or oil filled with grit and sand is a chain killer. Anytime you notice that your chain is covered in crap or full of grit then it’s time to clean it. If you ride in the rain, it’s time to clean it.
There are lots of ways to clean a chain but I stay away from really harsh solvents (petrol etc). A simple citrus based degreaser and a chain bath will do the job just fine. Clean the cassette, chainrings and jockey wheels at the same time. You might need to replace the fluid in the chain bath several times and run the chain through it each time to remove all the oil and grit. If you twist the chain gently, you can feel if there are still small particles between the links.
Once you’ve got it clean, spend some time rinsing the chain to remove all of the cleaning product. Failure to do this will mean that the degreaser just strips away any new oil.
I’ve seen people place a single drop of oil on each link. Maybe I’ve even done this myself. It’s a bit OCD and unnecessary, but also kinda cool. For best results I like to make sure the chain is dry after cleaning, then flood it with oil. Next I wipe the chain with a clean rag to remove all the excess (you only need the lube on the inside – excess lube on a chain just attracts more dirt). Leave the bike overnight and wipe the chain a second time to ensure it’s not swamped with oil, and you’re done. I also practice the chain oil flushing procedure with new SRAM chains, as they come out of the box covered in some sort of post nuclear wax-like sludge which can be an annoyance to put it mildly.
Wear and Tear
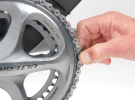
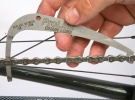
How do you know when it’s time, Old Yeller? There are two ways to figure out when your chain is done. Firstly you can use one of the chain checking tools or at a pinch, a ruler. These are my favourite as they always tell you to replace the chain, even when it’s brand new… For better results and once past 2,000 kilometres, go to the three o’clock position on the chainring and try to lift the chain off the chainring. If it doesn’t move much it’s fine. If you can lift off half a tooth it’s getting close, and once you can lift the chain clean off the chainring, it’s really dangerous and you should have chucked it a long time ago. Worn chains are dangerous (snapping and falling off) and they’ll also eat your cassettes and chainrings much faster.
Love your chain and it will love you back.