
Steve Hogg drives a wedge into cleat positioning and reveals how a simple adjustment can dramatically improve your pedalling efficiency.
It often surprises me that riders who are otherwise serious about their sport don’t know what their cleat position is. They may train to a periodised program and use training aids like heart rate monitors and power measuring devices but not fully appreciate the implications of their cleat position. In answer to my query I often hear “I just put them on without thinking”, or “My shop / friend / coach put them on for me. I’m not sure what position they are in.” Every watt a rider produces is transferred to bike via feet on pedals and cleat position has an effect on the pattern of muscular enlistment of the legs. In turn this can affect performance, propensity to injury and recovery time. This article will attempt to explain the ins and outs of cleat position. There are five basic variables to consider:
1. Position fore and aft.
2. Cant
3. Rotational angle
4. Lateral placement
5. Whether to shim or not.

Position Fore and Aft
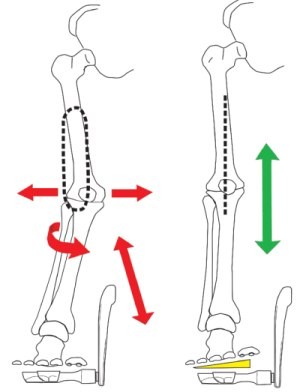
A foot in a rigid soled cycling shoe functions as a lever. The efficiency of that lever depends on its length and the placement of the fulcrum. The fulcrum of the foot is at the ankle, near the rear of the foot. This is not the ideal fulcrum placement for maximising lever efficiency by maximising lever length. So where to place the cleat?
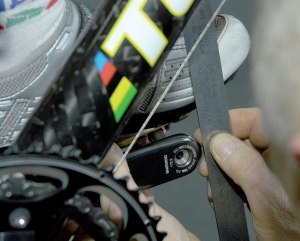
The time honoured advice is to place the cleat so that the centre of the ball of the foot is over the centre of the pedal axle as measured with the shoe level and the crank arm at the three o’clock position. Is this valid advice?
Maybe, maybe not; there are other factors to consider. The muscles of the lower limb stabilise the foot on pedal. The further forward the cleat is relative to foot in shoe, the harder the calves have to work to control that lever length.
The further back the cleat is relative to foot in shoe, the less hard the calves have to work to control the foot. Bear in mind that the work the calves are doing with regard to control of foot and ankle doesn’t directly contribute to propulsion of the bike, just to controlling the foot and ankle. Lower leg amputees demonstrate clearly that moving the cleat back directly under what would be the ankle of an able bodied cyclist is valid in the sense that it can be made to work effectively. Conversely many track sprinters also demonstrate readily that a far forward cleat position can be made to work just as effectively for them. Published studies of cleat position generally conclude that cleat position doesn’t have a lot to do with the ability to generate power.
Most road riders need a cleat placement far enough back to relieve the calves, Achilles tendon and plantar fascia of unnecessary load and that gives them a solid feel under foot, while not being so far back that it limits their ability to sprint or to climb while off the seat. My experience is this – generally speaking (and I include that caveat because there will always be exceptions), the shorter and more extreme the effort, the further forward the ideal cleat placement. The longer the effort required, whether of high or low intensity, the further back the cleats should be.
 The glutes, hamstrings, quadriceps and calves are all heavily involved in pedalling. Of these muscle groups, the calves are the smallest and often the first to fatigue. Here are some general recommendations for cleat positioning for road riders
Shoe size 36 – 38: centre of ball of foot
7 – 9mm in front of the centre of the pedal axle
Shoe size 39 – 41: 8 – 10mm in front
Shoe size 42 – 43: 9 – 11mm in front
Shoe size 44 – 45: 10 – 12mm in front
Shoe size 46 – 47: 11 – 15mm front
Shoe size 48 – 50: 12 – 17mm in front
There are a number of qualifiers that I will attach to the above recommendations. This info is for road and mtb riders. For general track riding, I would reduce the amount of foot over the pedal by a millimetre or two depending on shoe size and event.
For sprinters and kilo riders, I would halve the recommended amount of foot over the pedal. For riders with an exceptional heel dropping pedalling style, I would increase the amount of foot over the pedal slightly; i.e move the cleat further rearward. The converse is true for the exceptional toe down style peddlers. For both groups I’m talking about technique under moderately severe load, not cruising in a small gear pedalling fast. For riders with a lot of heel lift in their shoe last, I would increase the amount of foot over the pedal slightly. For riders with flexible soled shoes; sneaker or sandal type mtb shoes for instance, I would increase the recommendation slightly as with this type of shoe the heel deflects downwards more under load.
There is also another approach worthy of mention. A small minority of riders including some Euro pros and elite triathlete are using a mid-foot cleat position popularised by Germany’s Gotz Heine. This involves placing the cleat so that the pedal axle is under the highest point of the arch of the foot. There are both advantages and disadvantages to this. Many riders perform better with cleats positioned like this, particularly ultra endurance and TT riders. Space doesn’t allow me to go into the detail that cleat fore and aft position deserves but ultimately the message I am trying to get across is this – Don’t be afraid to experiment with cleat position. Individuals vary in both the type of riding they do and what works best for them. Have a play and make a personal decision.
 Cant
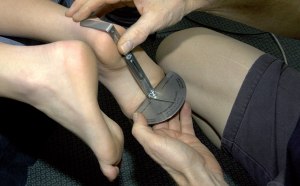
CantThe knee is a more or less single plane joint positioned between two multi plane joints, the hip and the ankle. Very few people have a perfect foot plant. Perhaps a few per cent only. In theory, the great majority of cyclists have common malformations of the foot and should experience knee pain as the price they pay for exerting force with less than wonderful feet, but they don’t. They don’t because they compensate and there are three main ways to do this on a bike. Everyone uses at least two of these methods of compensation to individually varying degrees. The first is to load up the outside edge of the foot (or far less commonly, the inside edge of the foot) in an autonomic effort to keep the knee tracking straight.
The tell tale is a callous under one or both fifth MTP joints, the base knuckles of the small toes. The second is to internally rotate one or both hips (point the knees inwards) or to externally rotate one or both hips (point the knees outwards), both of which will cause issues with the hips, lower back and general posture over time. The last is that neurologically speaking, we all favour one side. My experience is that on a bike, 95% of riders, whether right or left handed, favour and protect their right leg on a bike at some level great or small and sacrifice their left leg at some level great or small. This ‘favouritism’ takes the form of a perceptible hip drop or pelvic twist. If the rider is functionally superior, then this may be almost imperceptible. If they are functionally poor, then it is very obvious.
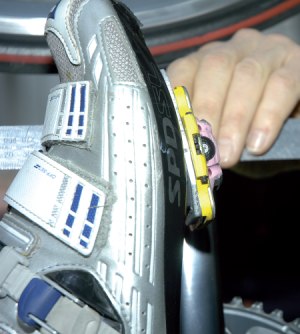
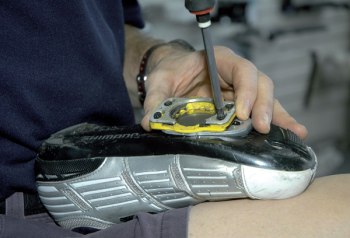
There are other potential causes for these issues but many, many times they can be positively influenced by altering the cant of the foot on the pedal. Something over 90% of riders will perform better and / or lessen their chances of overuse injuries with some degree of cant under one or both feet. The majority of those need the foot to be everted, i.e. the inner edge of the foot lifted. There are currently two ways to do this. The first is to use BFS Cleat wedges which are shaped plastic wedges that fit under the cleat. There are versions that will work with all major pedal systems. The second is to use Specialized in shoe forefoot wedges to achieve the same effect. Of the two, in my opinion, the BFS Cleat Wedges are superior for the following reasons.
When foot canting is necessary, most of the time the issue is the rear foot. BFS Cleat Wedges work well because they are positioned under the cleat and so correct the entire foot. The Specialized in shoe forefoot wedges indirectly influence the rear foot by canting the fore foot. Because this method of correction is indirect, a greater height of cant is required to achieve the same effect at the rear foot and a small minority of susceptible riders experience problems with indirect canting because of torsional stresses that can be caused to the midfoot. Alleviating this to some degree, Specialized build a measure of cant into their shoes and are the only shoe manufacturer to do so.
Rotational Angle
Most current pedal and cleat systems have an amount of ‘freeplay’ built into the cleat or, as in the case of Keywin, the pedal body. The purpose of this freeplay is to allow the foot to move to some degree while remaining securely locked into the pedal. Some pedal and cleat systems have a fixed amount of freeplay, some have adjustable freeplay and others offer a variety of cleats with differing amounts of freeplay. Look for instance; offer a black cleat with zero freeplay, a grey cleat with 4.5 degrees of play and a red cleat with nine degrees of play. The ideal rotational angle of the cleat on the sole of the shoe is the one where while pedalling under load the rider has a more or less even degree of free movement either side of where their foot naturally sits on the pedal. If the foot is locked in place at a less than ideal rotational angle, stresses on the knee result.
 The simplest method to get the correct rotational angle is as follows; while riding at a solid pace, stop pedalling and coast with the right foot forward. Attempt to move your heel inwards. Is there available movement? If the answer is no, stop and adjust the cleat to allow the front of the cleat to face further towards the inner edge of the shoe, and then retest until there is available movement. Once you have available heel in movement from your natural placement under load, repeat the pedal and coast test but this time attempt to move the heel outward. Is there available movement? If the answer is no, stop and adjust the angle of the cleat so that the nose of the cleat faces further to the outside of the shoe. Retest until the amount of heel movement in and out of your natural rotational angle is fairly even. Then repeat on the other foot. For the great majority of riders, freeplay in pedal / cleat systems is desirable. If you are not using the available free movement, then it isn’t there. If you are using it, you need it. There are many factors that will influence what the ideal cleat rotational angle is for you. Hip width, Q factor of cleat and crank combination, flexibility in hips and lower back etc. It is an individual thing and the ideal rotational angle may vary between left and right sides because of functional asymmetries.
Lateral Placement
Ideally our knee joint should track straight up and down during pedalling. Generally speaking, the centre of the knee should descend over the second toe. Wider hipped riders should have their feet further apart than narrow hipped riders but hip and lower back function plays at least as great apart in what the ideal lateral cleat placement should be. We all have seen riders whose knees stick out while pedalling because they are tight in their hips and lower backs. They will need their cleats further in on the shoe (that’s right, moving the cleats further inboard, moves the feet further apart) than similarly built riders who are more functional. In extreme cases fittings called Knee Savers need to be fitted to space the pedals 20, 25 or 30mm further out than can be achieved by altering cleat lateral placement alone.
One of the problems with achieving ideal lateral placement for cleats is that most pedal manufacturers combine the rotational angle adjustment and lateral placement adjustment functions. Usually this is affected by having a washer for each cleat mounting screw sitting in a slot that is wider than the washer. The problem being that the more the cleat rotational angle varies from straight ahead, the less lateral adjustment this combined adjustment approach allows. Speed play deserves special mention for being the only pedal system that separates rotational angle adjustment and lateral adjustment functions.
Whether to Shim or Not
The last factor to consider with regard to cleat position is cleat shimming. A shim is a build up placed under one cleat to compensate for a measurable or functional leg length difference. A measurable leg length difference is one where there is a known bone length difference between sides. The only definitive way to determine this is with an X ray, MRI or similar. Competently taken measurements of leg length using external bony landmarks have a typical plus / minus error factor of 5mm which means that they are not accurate. A functional leg length discrepancy is one where for instance, one hip, or the hamstrings on one leg are noticeably tighter than on the other side which may limit the ability of that leg to extend even though there is no measurable difference in length. One of the aims that we are all trying to achieve on a bike is to sit as squarely as possible on the seat and have both legs reaching the bottom of the pedal stroke with similar power and control. Any measure that moves the rider closer to that goal is a positive, at least in the short term. Adding a shim under one cleat can make a positive difference for a significant minority of riders.
There are various ‘rules of thumb’ for which height of shim stack to use to compensate for a measurable leg length difference, depending on whether the difference is in the upper leg, lower leg or a combination of both. Like all ‘rules of thumb’, they are as likely to be wrong as right so I don’t place any weight on them. The correct height of shim stack is the one that allows the measurably or functionally shorter leg to reach the bottom of the pedal stroke with the same fluency and control as on the other side while concurrently, not causing the rider problems at the top of the pedal stroke. As a guide, if the majority of measurable difference is in the femur, then that discrepancy doesn’t need to be fully compensated for because the femur doesn’t point vertically during seated pedalling. In contrast, the lower limb stays closer to vertical for most of the pedal stroke and so any discrepancy needs to be more fully compensated for.