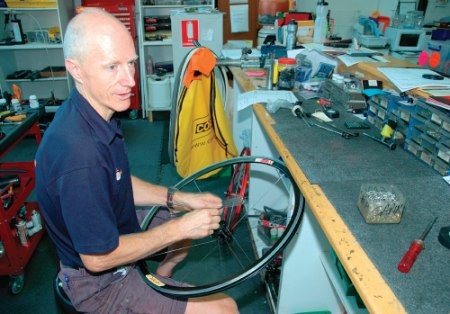
A well built wheel is a beautiful thing and in the vertical plane, is the strongest structure relative to weight that the human race can devise. With the advent of quality pre built wheels, wheel building by hand is becoming a bit of a lost art. This article will be an attempt to explain the intricacies of the wheel builder’s job in building a classic spoked wheel. For the purposes of this article, you are going to buy a pair of wheels and I am going to pre-emptively answer your questions and explain the component variables and the process of building the wheel.

When a wheel builder talks to a customer regarding a prospective set of hand built wheels there needs to be a clear understanding of what the purpose of the wheels will be. Is the major priority, strength, weight or price? Do they need to be particularly aerodynamic or are they wheels that will be ridden in all weathers and conditions to accumulate miles? Do they have to do and be a bit of everything? These are some of the questions that need to be answered. Let’s look at the components of a wheel keeping in mind that like all things, a good pair of wheels is a balance between sometimes contending requirements.

Hubs
One of the first things that a customer needs to understand is that few conventional hubs are designed for radial lacing. Radial lacing is when the spokes travel from hub flange to rim without crossing over or under other spokes. The spoke tension of a radially laced wheel is attempting to pull the spoke through the hub flange through the least amount of hub flange material. In contrast, a cross pattern spoked wheel is built with the spokes leaving the hub tangentially meaning that there is more material resisting pull throughs between where the spoke head is anchored in the hub and the direction the spoke is being pulled by spoke tension.
If you want a radially laced wheel, some manufacturers warrant their hubs for this pattern and they are the ones that should be chosen if radial lacing is a ‘must’. There are several factors that mean radial lacing is often a poor choice but we’ll get to those when we talk about spoke patterns. Quality hubs have small spoke holes. The closer they are to 2.0mm in diameter the better, and small differences can be meaningful. There is a practical problem here. For the purpose of maximising strength, spoke threads are rolled on during manufacture rather than cut into the spoke. This means that the diameter of the threaded section at the high point of the thread is larger than the shaft of the spoke by a fraction of a mm, meaning in turn that the spoke holes need to be that fraction larger for the threaded section of the spoke to fit through. The most commonly used spokes have a diameter of 2.0mm at the elbow where they pass through the hub flange. As a wheel rotates, the stresses on the spokes are cyclical. The spokes above the tyre contact patch which point down from the hub lose tension fractionally as the wheel deforms infinitesimally while supporting the weight of rider and bike. The spokes above the tyre contact patch pointing up from the hub increase in tension by the same amount and for the same reason. These cyclical stresses cause miniscule movements of the spoke elbow within the spoke hole. The tighter the fit between spoke and spoke hole, the longer the fatigue life of the spoke, all other things being equal.
The reason that many inexpensive and moderately priced hubs have larger than ideal spoke holes is that it makes the job of inserting the spokes into the hubs easier for automated wheel building machines. So choose hubs with smaller spoke holes, which is just about all the better models from larger manufacturers. Another thing to consider is the dishing asymmetry of the rear wheel. Despite the fact that it is the driven wheel with periodic torque loadings (rider stamping on pedals), that don’t occur in the front wheel, as well as bearing much more weight than the front wheel and despite having a 30mm longer axle, it might surprise a few people to find that rear wheels are not as strong laterally as front wheels.

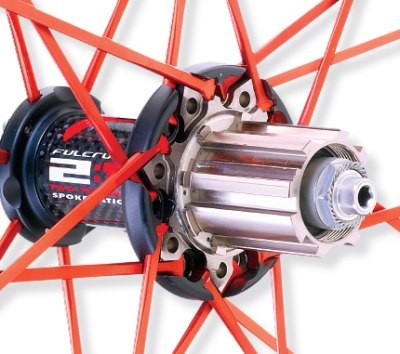
This is a by product of multi geared derailleur bicycles. Look at a rear wheel from directly behind. You will see that the drive side spokes leave the hub flange at a more vertical angle than the non drive side spokes. This is necessary to fit in 9.10.or 11 cogs on the drive side of the wheel. This also means that while the rear rim is centred between the ends of the rear axle, it is not centred between the hub flanges and is much more over the drive side hub flange. As a consequence, the spoke tension on the drive side of a rear road wheel is approximately twice that of the non drive side. Spoke tension could be equalised if the hub was designed with the non drive side hub flange closer to the centre of the hub and periodically, different manufacturers have tried this.
My experience is that hubs designed like this don’t have enough flange separation for optimum lateral strength. They may be okay for lighter riders and TT use but are not ideal for heavier racers stomping on the pedals before the bike is fully upright when exiting a corner in the local crit or similar situations. The larger manufacturers have settled by trial and error on rear hub flange separations of around 52 – 58mm with a drive side centre to flange dimension of 16 – 19 mm and a non drive side centre to flange measurement of 34 – 38mm, though there are exceptions. By way of comparison, front hub flange separation is typically 70 to 80mm. Ideally, the non drive side centre to flange measurement should be close to twice that of the drive side for the best balance between spoke tension equality and lateral strength of the finished wheel. There are ways to improve on this but I’ll leave that until we get to rim choice.
Rims
A rim has to support the tyre and resist the alternate left / right pull of highly tensioned spokes. What stops the rim being pulled into a sinuous snake like shape is the inherent strength of the extrusion and the care with which the wheel builder increases spoke tension incrementally during the building process. A lesser number of spokes means that a stronger (which usually means heavier), rim is necessary. Another thing to consider is how stiff the frame is that these wheels will be fitted to. If a frame is extraordinarily stiff, then usually the wheels have to be extraordinarily stiff as well if a long service life with minimal spoke breakage is desired. The stresses generated by the rider have to go somewhere. If the frame doesn’t flex, the wheels will be more heavily loaded than if everything else; frame, steering assembly and wheels all flex to some degree. So a choice has to be made between an aero section rim of 30mm or more, a mid section rim of around 25mm depth and a low profile rim of around 20mm depth. Generally, the deeper the rim section of conventional aluminium rims, the greater the weight and the harsher the ride.
As spoke count drops, the larger gaps between spokes mean that a stronger and usually heavier rim needs to be used to resist the alternate left / right pull of the spokes on the rim. There is a good case for having more spokes in the rear wheel than the front because as mentioned earlier, rear wheels are more heavily loaded but inherently weaker. For maximum reliability and minimum weight a combination of 36 hole rear / 32 hole front , 32 hole rear / 28 holes front or some other variation of this theme, depending on the weight and strength of the rider and the intended usage of the wheels, is ideal. On a personal note, I have been running a 32 hole rear and 24 hole front pair of wheels for many years without problems.
Rims come in single eyeleted, double eyeleted, socket eyeleted and non eyeleted types. An eyelet is a reinforcement that spreads the stresses of a tensioned spoke nipple over a larger area of the rim. For practical purposes there is no real advantage in any of these types of construction but my experience is that single eyeleted rims are more prone to stress cracking than non eyeleted or double eyeleted designs. Socket eyeleted designs need more careful building and more stress relieving during building than the other types because there is movement between the socket eyelet and the rim that has to be taken up until the socket eyelet is firmly seated. One last thing about rims is that there are some rear rims available with what is called ‘off centre’ design. What this means is that the rim is designed with the spoke holes drilled 3mm off centre towards the non drive side of the bike. In practice this means that a stronger wheel can be built than with a similar ‘centred’ rim because off centre spoke holes allow the effective dishing asymmetry of the wheel to be less. This in turn means better lateral strength because of a less vertical drive side spoke angle and the corollary of significantly higher spoke tension on the non drive side spokes than is possible with conventional centred rims.
Spokes and Nipples
Spokes are generally made from what is known as 18/8 stainless steel. The designation 18/8 refers to the two major alloying constituents, in this case a spoke is a minimum of 18% chromium and 8% nickel. It is these additions that give the spoke its sheen and resistance to corrosion. The 18 / 8 (or 300 series as it can be known) is malleable, durable and easy to work with. Spokes are also available in titanium and in the past, various composite materials. Titanium offers no advantage as a spoke material and composite spokes weren’t particularly reliable and seem to have died a natural death.

Spoke heads are usually round and have a slot in the top for a nipple driver or screw driver to help screw on the nipple when lacing spokes during wheel building. The underside of the spoke head tapers towards the body and depending on brand, this taper can vary in shape. The nipples I prefer are the Belgian Sapim brand because the under side of the head is hemispherical in shape allowing the nipple to cant towards the direction that the spoke is arriving at the rim just a tiny bit more than a standard tapered head.
This is not always necessary but I’m a believer that if you are trying to build a really good wheel, every little thing helps. Spokes are available in plain gauge, single butted, double butted, triple butted and bladed varieties. To explain briefly:
Plain gauge spokes are of a single diameter throughout the non threaded length of the spoke. They are less expensive to manufacture than butted or bladed spokes and are mainly available in 14 gauge; i.e 2.0mm. Plain 15 gauge (1.8mm) spokes used to be available but were a waste of time for mine because they are not as snug a fit and less well supported by the spoke holes in the hub flange. Plain gauge spokes are cheap and durable. Single butted spokes are thicker at the elbow and slightly past the elbow than they are in the rest of the spoke body. Single butted spokes are now uncommon as they offer no real advantage compared to the more common double butted spokes. Double butted spokes are thicker at either end than they are for much of the length of spoke body. This means that there is more material where stresses are highest. The most common double butted spokes are 14 / 15 gauge where the spoke is 2.0mm near the elbow, 1.8mm for most of the body and then returns to 2.0mm just below the thread. There are other and lighter variations of gauge available in double butted spokes. Triple butted spokes are usually only used in high load situations such in wheels for tandems and loaded touring bikes. The most common triple butted spokes are 13 / 15/ 14 gauge. That is 2.3mm at the spoke elbow ensuring the snuggest fit possible between spoke and the spoke hole of the hub flange, then thinning out for most of the spoke body length before returning to the common 14 gauge (2.0mm), just before the thread. The reason that the elbow end of the spoke is 13 gauge is that this approximates the diameter of the spoke thread and is as fat a diameter as can be fitted through the spoke hole of a high quality hub. Even then, they are a tight fit – a good thing.
Bladed spokes are flattened or ovalised for aerodynamic benefit. Other than the rider, wheels cause the greatest amount of aerodynamic drag on a bike as each spoke leaves a vortex of disturbed air behind it. Bladed spokes are an attempt to minimise this drag. Bladed spokes are available in wide versions which are basically a flattened 14 gauge spoke. That is round at either end but flat for most of its length. Spokes of this type need the spoke holes in the hub to be slotted so that the width of the blade can fit through. Wide bladed spokes are becoming less common. More common now are narrow bladed spokes like DT’s Aerolite and Sapim’s CX-Ray which are 14 gauge at either end and flattened to approximately 2.3mm wide and along the body and are very thin. These spokes are the most expensive commonly available as well as just about the lightest choice and tend to be the spoke of choice for lightweight, expensive wheels. Despite the light weight, the extra manufacturing steps and cold working involved allow these spokes to have theoretically, the longest fatigue life of any spokes.
Nipple bodies can vary in length but all nipples only have four mm of thread and that is all at the top of the nipple. What that means is that a nipple with a long body cannot be used to overcome the use of a spoke that is too short. For full thread engagement and maximum reliability, the end of the spoke needs to reach as far as the bottom of the slot in the nipple head when fully tensioned. A little more than this is fine because there is 10 mm of spoke thread to play with, but if the threaded end of the spoke protrudes too far beyond the nipple head it can punch a hole in the rim tape and cause unnecessary punctures. Whether you choose a brass or aluminium nipple will depend on what you intend to do with the wheel. Brass nipples are faultlessly reliable. Aluminium nipples save weight and are reliable in most situations with the following provisos. That they are oiled repeatedly where they protrude through the rim as the wheel is built if using a non eyeleted rim. This will prevent the sharp edge of the spoke hole of a non eyeleted rim from undercutting the nipple head leading to premature failure of nipple when the head pops off. That the wheels are built using a close fitting spoke key. Aluminium nipples are softer than brass and a poor fit between nipple and key can round the edges of the nipple, damaging it in the process. While I prefer the DT spoke keys for most things, Sapim make a key that is my preference for aluminium nipples. It supports the nipple on all four sides with only the minimum slot cut into one corner so that the key can be fitted over the spoke. If the intended use of these wheels is for all weather training, forget aluminium nipples. Over a long period some types and brands break down and crumble because of corrosion.
 This is a by product of multi geared derailleur bicycles. Look at a rear wheel from directly behind. You will see that the drive side spokes leave the hub flange at a more vertical angle than the non drive side spokes. This is necessary to fit in 9.10.or 11 cogs on the drive side of the wheel. This also means that while the rear rim is centred between the ends of the rear axle, it is not centred between the hub flanges and is much more over the drive side hub flange. As a consequence, the spoke tension on the drive side of a rear road wheel is approximately twice that of the non drive side. Spoke tension could be equalised if the hub was designed with the non drive side hub flange closer to the centre of the hub and periodically, different manufacturers have tried this.
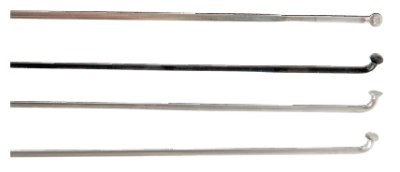 Spoke heads are usually round and have a slot in the top for a nipple driver or screw driver to help screw on the nipple when lacing spokes during wheel building. The underside of the spoke head tapers towards the body and depending on brand, this taper can vary in shape. The nipples I prefer are the Belgian Sapim brand because the under side of the head is hemispherical in shape allowing the nipple to cant towards the direction that the spoke is arriving at the rim just a tiny bit more than a standard tapered head.