Schwalbe is the world’s leading bicycle tyre manufacturer and a proud supporting partner of the Noosa’s own Gran Fondo cycling event, the Noosa Classic on Sunday August 26.
Not only one of the world’s most trusted and relied upon bike tyres, the German manufacturer also leads the way in tubeless tyre technology. With less weight, reduced rolling resistance, increased comfort and obviously a far slimmer chance of puncturing, it’s no wonder so many riders – not to mention manufacturers – are now choosing to turn to the tubeless system.
First Let’s Quash A Common Myth
“But it’s difficult, time consuming and potentially very messy to set up tubeless,” you may have heard. Despite that common belief that the tubeless system is a complicated affair, it’s really not that difficult nor time consuming.
The good people at Schwalbe Australia have helped us with some tips on converting your tubeless ready wheels to the simpler, easier and more efficient and worry-free system. Ready to give it a go? A great starting point is the handy tubeless kit offered by Schwalbe.
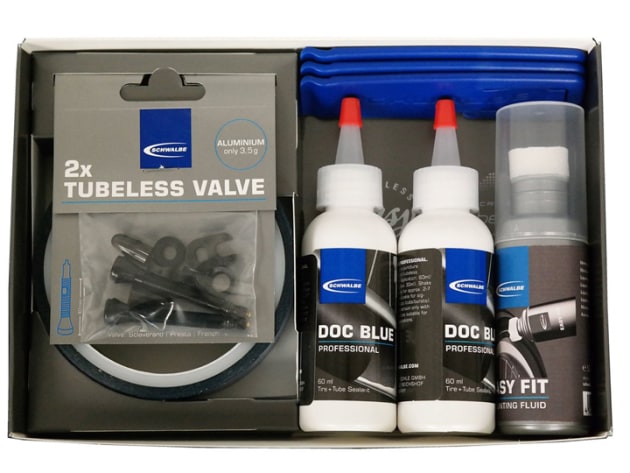
What You’ll Need
- Schwalbe Doc Blue tubeless tyre sealant.
- Schwalbe One Pro tubeless-ready tyres (ensure these are compatible with your rims).
- Tubeless valve stems with the correct rubber grommet to match the inner profile of your rims.
- Valve core removal tool.
- Tyre levers.
- Schwalbe Easy Fit tyre fitting fluid.
- Rim strips or tape to make your rims ‘tubeless ready’.
- A quality floor pump
How To Do It, Step By Step
1. Ensure your rims are designed for and ready for tubeless use. You may need to fit moulded plastic strip – the type that give the inner rim a profile that locks the tyre bead on the shoulder.
2. Apply tyre mounting fluid to the first section of bead you plan to start with. This product is designed to help the bead pop into place during inflation, it also helps getting the beads onto the rim initially as tubeless tyres can (understandably) be a tight fit.
3. Start opposite the valve and slip one side of the tyre onto the rim. Make sure that the bead sits in the lowest or deepest part of the U-shaped rim channel; this will give you the greatest amount of slack to work with when pulling the tyre on.
4. Position the last section of the bead onto the rim up near the valve. This will require some effort and some rim/tyre combinations will be tighter than others. Once the bead is on, push it over to the other side of the valve grommet.
5. Lube the next bead up in preparation for mounting. It is possible to add the liquid sealant at this stage but we prefer to inject it via the valve later.
6. Once again start opposite the valve and place the bead at the lowest point in the U-shaped rim bed. Push down evenly towards the valve to stretch the tyre on and develop as much slack as possible in the casing.
7. To get the final section of the tyre on you’ll most likely need tyre levers. Make sure they’re free from any sharp edges that could damage the bead. Hold one side of the bead in place with your thumb while you work the other side of the bead on in small sections. Add more lube if required.
8. With both beads on the rim, position them on either side of the valve. Give the whole tyre a visual inspection to ensure that it’s sitting evenly on the wheel and pulled into shape—this will help when pumping up for the first time.
9. Attach a floor pump and with a few short hard pumps the tyre should seat and inflate. If air is escaping add a little more mounting fluid around the bead and remove the inner valve core to boost the airflow.
10. Pump the tyre up to around 80psi. You’ll probably hear a number of loud cracks and pops as the bead is pushed up onto the shoulders of the rim—this is normal. Inspect the tyre to ensure that it’s evenly seated on the rim. If not sitting well and properly rounded, deflate, apply more fitting lube to the bead and re-inflate.
11. Deflate the tyre and unscrew the inner part of the presta valve (most tubeless valve cores are removable). Using a proper removal tool is less likely to damage the valve but a small shifter or long nosed pliers will work.
12. Using an applicator bottle or syringe, inject the sealant through the valve stem. Check with the sealant manufacturer for the recommended amount but 30ml should suffice for most 25c road tyres.
13. Refit the valve core and inflate once more—it should go up with ease as the beads will be tightly locked in place on the tubeless rim. Once up to pressure, recheck the tightness of the valve nut as these can loosen when the tyre is fully inflated. Try running 10psi less than you did with inner tubes for a smoother ride.
14. The final step ensures there are no small leaks around the bead-to-rim junction. Hold the rim at a 45-degree angle with the tyre resting on the ground. Once the sealant has settled towards the bottom of the tyre, give it a bounce and a shake to ensure the sealant makes contact with the sidewalls. Move the tyre around an eighth of a turn and continue the process until you’re satisfied the inner walls are completely covered.
Do this all the way around on both sides – now you’re ready for an even better Gran Fondo experience and worry-free cycling.
For more on Schwalbe’s road cycling tyre solutions visit their website, and for full details on August 26’s Noosa Classic read more and register via this link today!