Have a think about something: On your last ride, climbing the steepest hill you went up, how many times did you push the lever, desperately searching to find that bigger, even fractionally easier gear? Even though you knew it wasn’t there! Einstein’s definition of insanity springs to mind; “doing the same thing over and over again and expecting different results”. Chances are, after buying your bike you may have put little thought into upgrading one of the most critical components on your dearly beloved; the cluster.
Risking to state the obvious, the ‘cluster’ is that group of cogs or gears that sit nicely on the hub of your rear wheel, making it either harder or easier to pedal depending on where you shift your chain to lie. Arguably, a ‘standard cluster’ is a 12-25 (where the smallest cog has 12-teeth and the largest has 25) and chances are, this is what came on your road bike when purchased. If you’re looking to invest in another cluster for your bike, hopefully the following will act as a guide as to which ‘combination’ to buy and then how to change it on your bike.
At this time, most groupsets across all manufacturers (Shimano, Campagnolo and SRAM) are mostly 10-speed, however there are still a couple of 9-speeds being manufactured while 11-speed seems to be the future vogue. So for a 10-speed groupset, this means the cluster will have 10 gears (or cogs) on it and can incorporate ratios as varied as 11-21 right through to a 13-35 and almost everything in between. However the most common road clusters have an 11 or 12 small cog and 23, 25 or 28 large cog.
Most may think that obviously an 11-28 combination would be the best because you have a gear for all scenarios: sprinting, descending and climbing! However this is not necessarily the case. Let me explain why. When riding on the flat, do you ever get the feeling that you’re in the perfect rhythm or cadence (pedal revolutions per minute)? As Lance Armstrong used to say, a feeling of ‘no chain’. It just feels like you could ride forever and ever at that pace. However when you change gears up or down do you loose that feeling and rhythm immediately? This would most likely be the case of changing from, say a 19-tooth cog to a 21 or 17. If in fact you had instead a 20 or 18-tooth to change to, you may not loose the feeling. The key is that your cadence has stayed in your ‘optimum range’ – but more on that shortly.
The fact is, with a wide range cluster such as an 11-28, there are greater jumps each time you change gear. Conversely with an 11-21 for example, you are less likely to lose that rhythm. Like everything in cycling, it’s a trade-off. An 11-21 is ideal for racing a criterium where you will not need to go lower than a 21-tooth cog. However if it’s your 100km Sunday ride through the hills or city, you are going to need that greater range of gears, even if it does sacrifice a bit of your rhythm if favour of getting up those steep hills in one piece.
The key as I mentioned is cadence. Going back to everyone’s favourite American, Armstrong popularised the notion of riding at a higher cadence (around 100rpm) in order to keep your legs fresh. However it is a rhythm that doesn’t work for everyone. If you watch your local 120kg E-Grader at the club crit try to maintain 100rpm, you’ll see it for yourself. It all depends upon your weight and power. Usually a heavier and/or more powerful rider will feel more comfortable and have that ‘no chain’ feeling around 80rpm while a flyweight climber in the form of a Matthew Lloyd or Ivan Basso will feel more comfortable around 100rpm. This is why when we see Cadel Evans struggling up the Pyrenees in July, he seems to be pedalling substantially slower than the others – because he is! It is simply down to what cadence feels most comfortable for the individual. If you’re a big rider, don’t let the 50kg A-Grader tell you that you should be pedalling faster in an easier gear – maybe you shouldn’t.
The bike that you buy from your local bike store may have a cluster that is inappropriate for your style of riding. More often than not, the person speccing your steed will have been influenced by what the pro riders use. However, if this doesn’t sound like you, you’ll be pleased to know that it’s fairly easy to change your cassette.
Changing Your Cassette
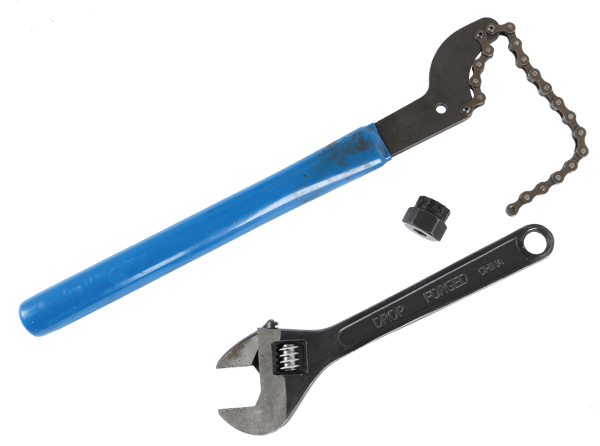
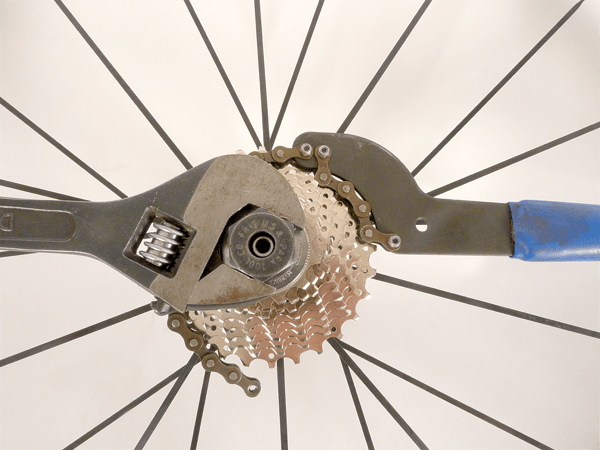
You will need three main tools in order to change your cassette; a chain whip, a cassette lock ring tool and a large shifting spanner (shifter). The following simple steps should have you pedalling that easier gear in no time!
- Remove the rear wheel from your bike and then also remove the quick release skewer ensuring you keep all parts and springs together as they have a tendency to disappear!
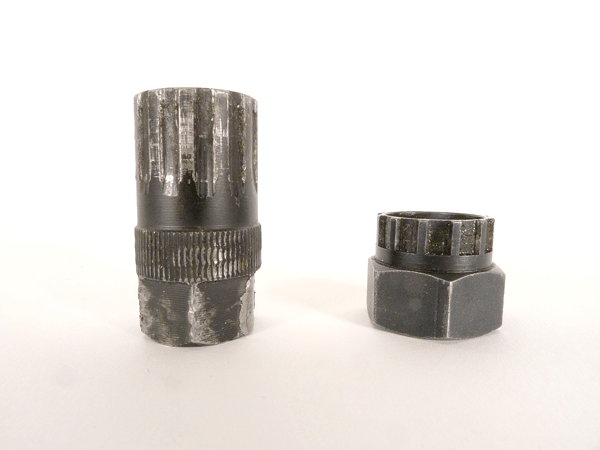
- You will notice a small plate screwed into the end of the smallest cog on your cluster, this is called the lockring. Place your lockring tool in the lockring and it should sit snugly within the hole. Note too that when buying the lockring tool, it is a different size and shape for each groupset, i.e. a Shimano tool will not unlock a Campagnolo ring and vice-versa.

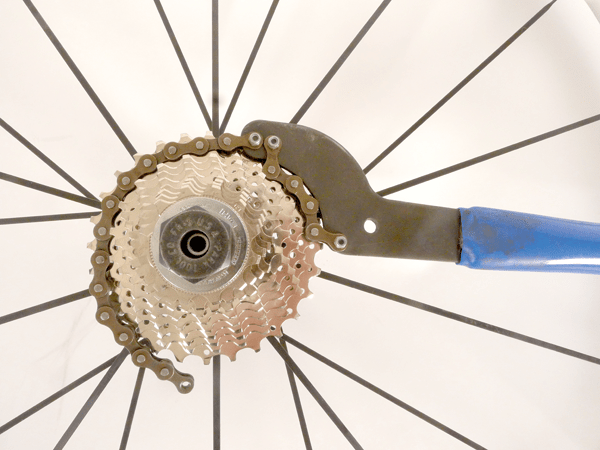
- While the lock ring tool is still inserted, place the chain from the chainwhip tool clockwise around the cluster on the third-largest cog. As you are looking at the cluster, the handle of the chainwhip should be on the right.
- Place the shifting spanner on the lock ring so that the handle of the spanner is opposite the handle of the chainwhip (so they are at a “quarter-to-three” position)
- The chainwhip is needed because if you try to unscrew with the spanner alone, the cluster will simply freewheel.
- Now attempt to unscrew the locknut by pushing down on both handles (attempting to get them to a “half-past-six” position). It may be a bit difficult to crack, especially if it is the first time you have unscrewed it. After the initial force, you should just be able to unscrew it with your fingers.
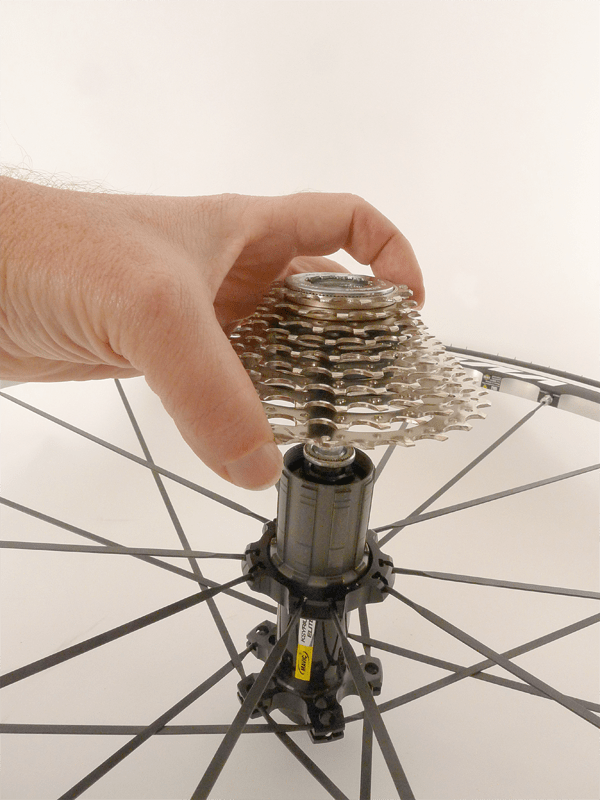
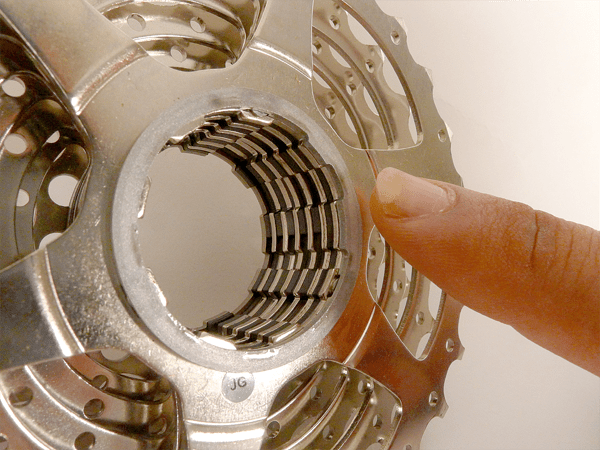
- Once the lock ring is removed, your cassette should simply slide off the hub of the wheel. Thread a cable tie through the centre of the cluster and fasten it so as to keep all the cogs and spacers in their respective positions. However, if you forget to do this, just ensure that the cogs are in order from smallest to largest with the cog number (i.e. ‘15’ or ‘17’ etc) facing outwards with a spacer between each.
- The hub will have a pattern around it that mimics that on the inside of the cluster, with this in mind place the new cluster on the hub. The trick is to look for the largest gap on the spindle and match it with the cluster. If you line them up correctly, they should slide on one by one with little or no difficulty. Don’t forget the spacers!
- Screw the lock ring back onto the new cluster with your fingers initially and then tighten it with the shifting spanner. You will not necessarily need the chainwhip for this step as it only ‘freewheels’ when unscrewing (where the cluster spins anti-clockwise). However we advise that you still use the chainwhip as it relieves pressure from the spokes when tightening.
10. Place the quick-release skewer back into the wheel and place the wheel back into your bike.
With a task that will take only around 20-30 minutes, you have a whole new set of gears that will completely change your ride, hopefully for the better! It’s a good idea to keep the cable tie around you spare cluster and put it in a box with the gearing written on (i.e. 12/23) so as the next time you want to change back it is a quick and efficient process. Although unfortunately I still can’t guarantee that you won’t be searching for that extra gear up those hills!
Things to think about when buying a new cluster…
- What type of riding are you going to do? Is it a leisurely long distance Sunday jaunt or a State-level criterium
- What type of rider are you? Are you a heavy crit racer or a lightweight mountain goat
Personal Preferences. Is the ‘no chain’ feeling important to you or would you rather have a cluster for all situations.